 Print and Print preview
GenoPro can print your family tree or genogram to any printer installed on
your computer, from standard formats such as
letter (8½" x 11") and A4 (210mm x 297mm), to
large posters
and plotters.
Printing in GenoPro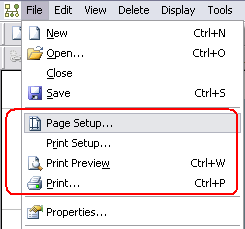
From the File menu, there are 4 actions related to printing:
The Page Setup dialog determines the number of
pages to print your family tree.
The Print Setup dialog determines the printer and
paper size to be used.
The Print Preview dialog displays a preview of
the content that will be printed.
The Print dialog does the actual printing.
The Page Setup dialog is used to specify the number of horizontal and
vertical pages on which to print your family tree. By default, GenoPro uses
a scaling factor to automatically compute the number of horizontal and
vertical pages, and it scales the printout accordingly.

The Print Setup Dialog
Margins
Reserved space on the edge of every printed page. Reducing the margin
allows GenoPro to print more information on each page. The margin is
also restricted by the printer hardware. If you specify a value that is
lower than your printer's restrictions, GenoPro will adjust this value for
you during the impression.
Reprints a small value of the border information on adjacent pages. By
default, the information reprinted is minimal (1/10th of an inch or
2.54 mm), allowing for a small margin of inaccuracy when using scissors or a
paper cutter to create a mosaic. If you have unstable hands for cutting,
increase the Page Clipping Threshold to 0.5 and you should have no
difficulty creating a mosaic.
Displays the print area in a light blue color. The Preview Print Area
checkbox is a real-time option to visualize the print layout and the
printing grid for the sheets of paper. You can enable/disable the View Print
Area at any time from the View menu or in the
GenoMaps context menu.


Center Horizontal and Vertical
Center Horizontal and Vertical
If your family tree does not fit on an entire page, you have the option to
have the extra space split evenly on the sides and top and bottom.
When GenoPro prints a genogram, the document boundary is calculated by
finding the objects found at the furthest point on the left, right, top and
bottom. This region is then highlighted in light blue and can be printed to
have a centered view of the family tree.
With the View Print Area you can see the exact effect of the centering
options.
Both horizontal and vertical options are checked by default.
Skip Blank Page
Do not print the blank pages. Printing a large genealogy tree may create
holes where there is nothing to print within an entire page. Check this
option if you do not want to have the header and footer printed on empty
pages.
This option is unchecked by default.
Print Header
Print the page number and the position of the page within the mosaic. This
feature is useful when printing a genealogy tree on multiple pages. This
option is unchecked by default.
Print Footer
Print the file name of the genealogy tree and the printing date.
This option is unchecked by default.
Print Hyperlinks
If checked, hyperlinks in GenoPro will be
printed in blue underlined text, otherwise they will be printed in black.
This option is unchecked by default.
GenoMaps
Each GenoMap has its own print settings, such as scale and paper orientation
(portrait or landscape)
The next three column values (zoom %, number of horizontal and vertical
pages) are calculated from each other, so if you specify one of the three
values, the others will be automatically updated. This way, the aspect-ratio
is always preserved.
By default all printing is set to 100% zoom. This represents a good size to
make the text legible for readers. If you want to view a larger format of
the tree, you can change the zoom to 150% or 200%. The number of pages and
the print area will be updated. You can also specify an exact number of
pages, for instance 5 horizontal pages.
You can print up to 150 horizontal pages by 150 vertical pages per GenoMap
(22 500 pages).

Print Using 8 Pages

Print Using 4 Pages Landscape Format
| | | |
 If your text is too small, increase the number of pages. If your text is too small, increase the number of pages.
Leaving the zoom at 100% will ensure all texts are legible. | | | | |
The Print Setup dialog allows you to select the printer and paper to be
used.

The Print Setup Dialog
You can select your printer from the list of installed printers. To
configure advanced options of the printer, click on the Properties button.
This will display printer specific options.
Paper Size
The size of the paper used by the printer. Some printers have many paper
sizes (letter, legal...), you can select the paper size you want.
Paper Source
The source is the paper tray that will be used to feed the printer. Auto
Select selects the default source, most often the 8½ x 11 paper size.
Orientation
The orientation in the Print Setup dialog is not used
because it is customized according to the GenoMaps in the
Page Setup.
The Print Preview is an exact preview of what will be
printed. It can be opened from the File menu or the
 (Ctrl+W) button.
You can view all the pages individually by using the Next and Previous Page
buttons.
You can zoom in and out to view the details.

The Print Preview Dialog
When ready, click the [Print...] button.
The print dialog is the final step before printing. It can be opened from
the File menu or the
 (Ctrl+P) print button.
You can modify the printer in this dialog as well. Be aware that changing
the printer may affect the page setup
if the new selected printer has a different paper size, for instance.
Select the range of the pages to be printed and the number of copies you
want of the document.

Print Dialog
You can specify the number of horizontal and vertical pages on which you
want to print your genealogy tree. GenoPro will automatically scale the
font to the desired layout. To change the number of pages, use the Page
Setup dialog from the File menu.
GenoPro can display your genogram in any font you wish. If you wish
to use a different font to support special characters in your alphabet,
you can change the default font in the document property dialog [Menu
File - Properties > Font]. Some users have printed their genealogy
tree in Chinese and Arabic.
You can copy & paste the selection to an empty GenoMap and print it.
If you make a change in a specific location, you can print individual
pages. Just do a Print Preview to locate the pages you want to print,
and from the Print dialog, specify which pages you want to print.
Yes. Many users have printed their genealogy trees on plotters. If
you don't have a plotter, you may go to a print shop and use their
plotter to print your family tree. GenoPro recommends using
Windows NT\2000\XP\Vista to print a large genealogy tree because Windows
9x has limitations regarding paper size. For instance, a printer/plotter
having a 1200 dpi resolution is limited by Windows 9x to paper
dimensions of 27 inches (69 cm).
|