How to Install VeraCrypt on a GUID Partition Table (GPT) on Windows 10
Steps to Install VeraCrypt on a UEFI hardware:
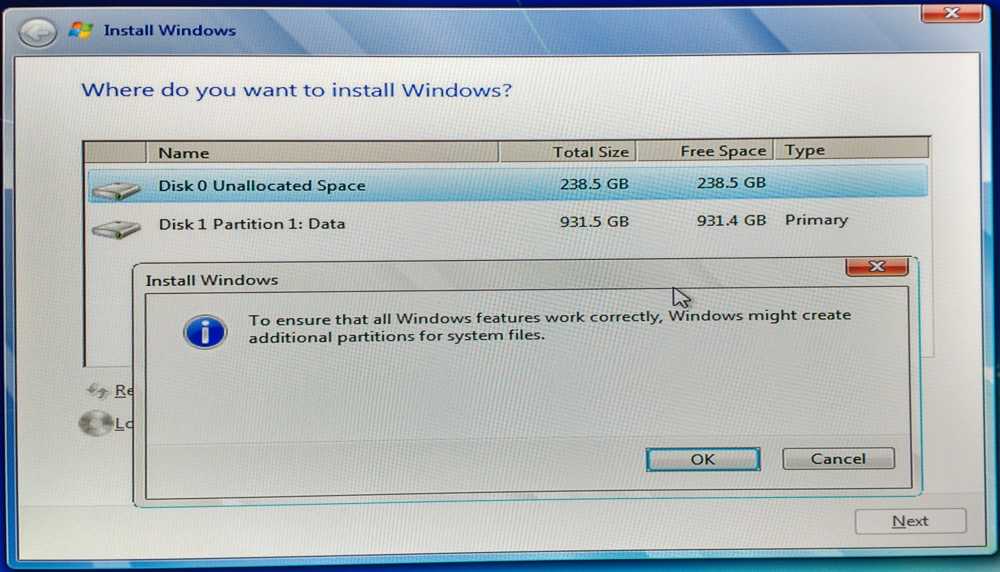
- Install Windows 10 on the drive you want Windows 10 to run. In
the picture below, we are installing Windows 10 on the second Drive
because it is our SSD disk. If your computer already has Windows
10 installed, as it is very frequent, go to Step #4 to
install
VeraCrypt.
- As soon as Windows 10 installed, remove your USB drive (or the DVD)
containing the Windows installation files.
- Start Windows 10 and pick your keyboard layout, WiFi settings, your
username and password.
- Install VeraCrypt and and start it.
- Select the button Create
Volume
- Select the option Encrypt the system partition or entire
system drive
- Select Normal as the type of System Encryption
- Select Single-boot
- Pick AES and SHA-512
- Pick a password you will not forget. If you forget your
password, you will never be able to reboot your machine and will
lose all your files.
- Follow the procedure for the recovery disk
- Pick your wipe mode. If you have a new installation, you
may select None.
- Restart your computer.
- While your computer reboots, press F2 or F2 or Delete
(depending on your computer manufacturer) to go to the BIOS setup.
- Go to the Boot menu and go to the UEFI Hard Disk Drive
BBS Priorities
- Select VeraCrypt BootLoader (DscBoot) as Boot Option #1.
This is important otherwise your computer will bypass VeraCrypt and
boot Windows 10.
- Next, go to the Security menu, select Secure Boot
and disable it.
- Save and Exit your BIOS.
- You whould see the VeraCrypt boot loader where you enter your
password and PIM (if any).
- Once Windows is running, you should see VeraCrypt displaying Pretest
Completed. Click on the Encrypt button to encrypt your
system disk.
If you have a second drive you wish to encrypt, follow the link
Encrypting the secondary drive (D:)
with VeraCrypt for a step-by-step procedure.
It is also possible to run VeraCrypt on Windows 7 on GPT disks
although this procedure may no longer work with new UEFI hardware. (see
solution)
This page was written by Daniel Morin on October 23rd, 2016 as "personal
notes" to recall how to install VeraCrypt on a system GPT drive. Since the
procedure is complicated and, at the moment, is fresh in my memory, I decided I
would be better write
it down before I forget something. I decided to make this page
public so other people may follow those steps without all the headache I have
been through. I want to emphasize the problem is not with VeraCrypt; it is
about Windows booting from a hidden GUID Partition Table from which VeraCrypt
does not recognize, thus displaying warning and error messages. By
contrast, TrueCrypt gives an error message it does
not support GPT drives, while VeraCrypt gives a warning.
The Challenge:
For a successful installation of VeraCrypt, you need to:
- Get rid of the system partition of 100 MB which is automatically created
by the Windows installer.
- Convert your system disk from GPT to MBR (Master Boot
Record).
- Go to the BIOS and change the boot mode from UEFI with CSM to
Legacy.
Otherwise the VeraCrypt Volume Creation Wizard will display the following
error while attempting to encrypt your system drive:
WARNING: Windows does not appear to be installed on the drive from which it boots. This is not supported.

If you encrypt the drive anyway, you will get the following error message
when booting:
Windows failed to start.  A recent hardware or software change might be the cause.
Status: 0xc000000f
Info: The boot selection failed because a required device is inaccessible.
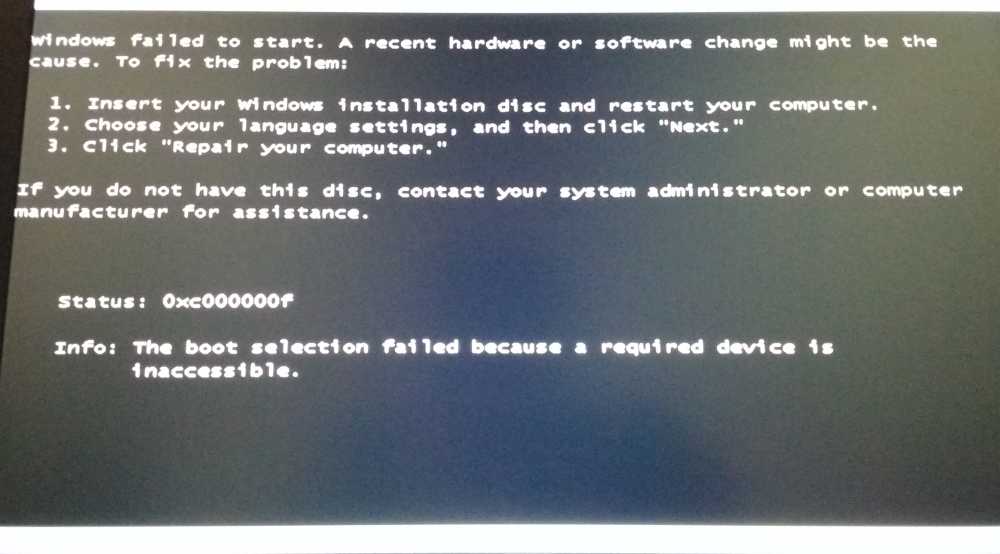
You may press Enter to continue and type your VeraCrypt password.
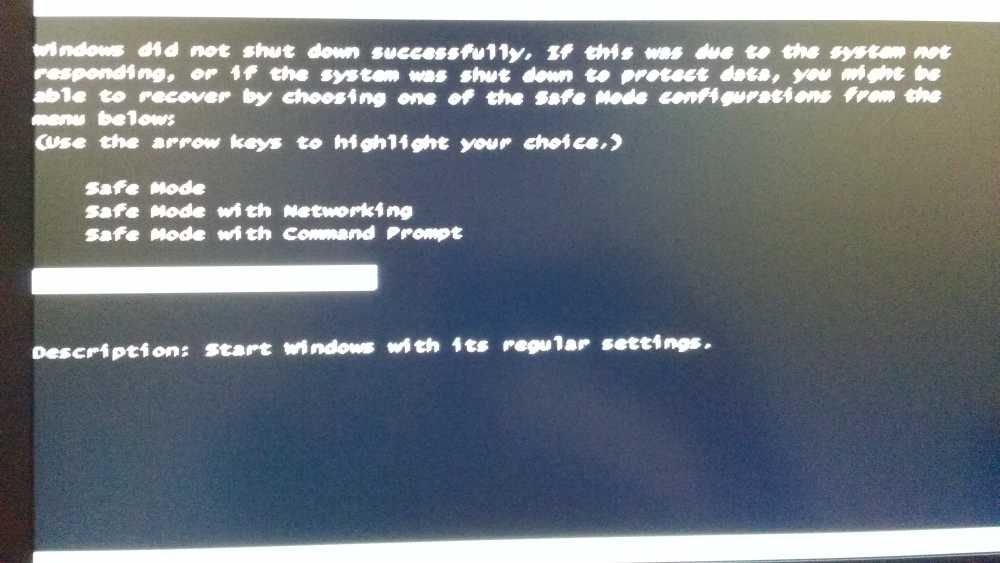
Sure your machine will boot, however if your machine goes into hibernation
(when you close the cover of your laptop or stay too long on battery), resuming
Windows will result in a reboot in safe mode.
For this reason I had uninstalled VeraCrypt until I found the article at
http://www.sevenforums.com/tutorials/71363-system-reserved-partition-delete.html.
I tried to delete the partitions, however the Windows Installer was
re-creating them:
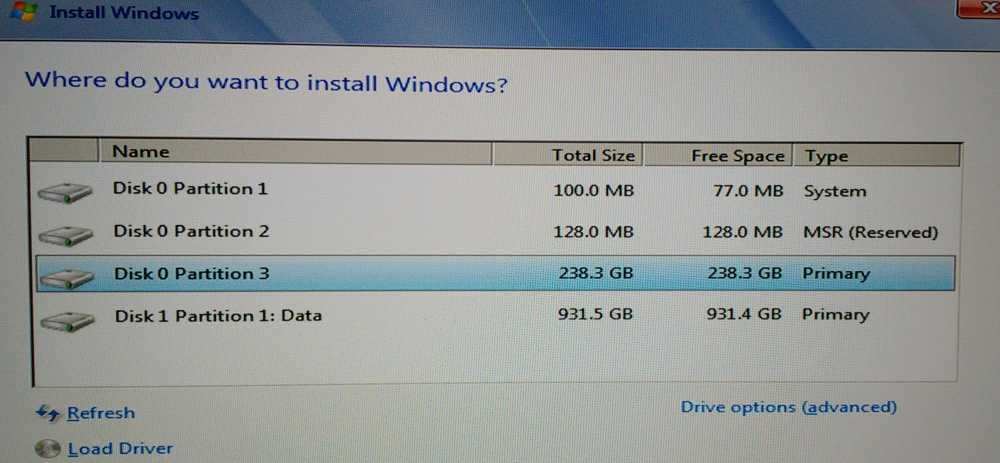
You may click on link Drive options (advanced) and delete the partitions,
however the Windows Installer will automatically re-create them.
Later I found the page
http://superuser.com/questions/462657/avoiding-the-pesky-windows-7-system-reserved-partition
which gave me the final clue how to make it work.
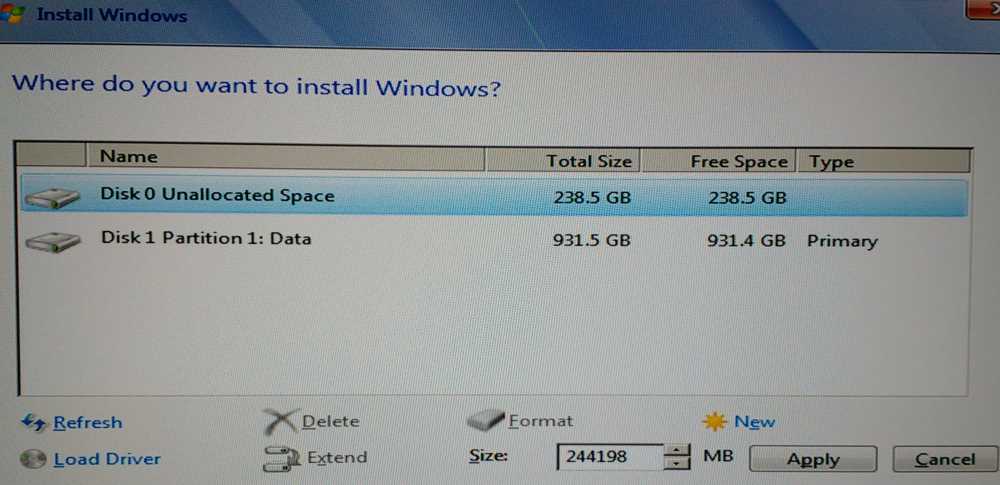
The key for having VeraCrypt successfully working is installing Windows 7
without the 100 MB partition.
In this example, I am using a new computer with two drives: a solid-state
drive (SSD) of 250 GB and a standard hard disk drive (HDD) of 1 TB. I want
to install Windows 7 on the SSD and encrypt both drives with VeraCrypt. Maybe
the following steps would also work with TrueCrypt, however since TrueCrypt has
been abandoned, I have not tried installing with TrueCrypt. TrueCrypt may
no longer give an error after the system drive has been converted from GPT to
MBR.
NOTE: Please backup ALL your
important files on the drive you are about to install Windows. The
procedure below will destroy the partition of your system disk which by
definition will destroy all data in it.
1. Boot from your Windows installation disk or repair disk. You may have to go to the BIOS by pressing either F2 or F2 or Delete (depending on your computer manufacturer) to change the boot configuration to boot from a USB drive or DVD.
2. On the First setup screen, that asks you for language settings, press Shift+F10. This will open a Command Prompt window.

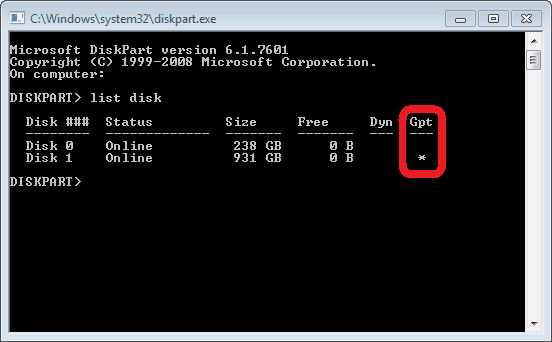
3. Type diskpart and press Enter. This will start the disk partitioning program.
4. Type the following commands into the command prompt window:
Note: The screenshot above was taken after
VeraCrypt was successfully installed. I tried several combinations and had
to re-install Windows 7 and/or VeraCrypt about a dozen times before getting a
working solution. During that time, I was not sure if it was even possible to
have VeraCrypt working properly on a GPT partition, so my last concern was
taking pictures/screenshots to document a procedure which may never work!!!
Most of the instructions below have been copied from
http://superuser.com/questions/462657/avoiding-the-pesky-windows-7-system-reserved-partition.
-
list disk (Shows a list of the disks currently in the computer. Take note of
the Disk ### and Size columns)
-
select disk 0 (Replace 0 with the number of the disk you want to install
Windows on)
-
clean (Wipes the disk of any existing partitions, for example if you're
re-installing over the top of an existing Windows install. If this
fails, you may try the command delete partition override and
convert mbr which converts an empty basic disk with the GUID
Partition Table (GPT) partition style to a basic disk with the master boot
record (MBR) partition style).
-
create partition primary (Creates a partition that takes up the
whole disk - if you want to specify a size add size=80000 for an 80 GB
partition) NOTE, if you create a partition with less space than the full
disk, create a second partition now as well, taking up the rest of the space
(Giving the Windows System Reserved partition nowhere to run to!)
-
select partition 1 (Selects the partition you just created. If you want to
list your partitions first if you created multiple, use list partition)
-
active(Marks the selected partition as the current 'active' partition.
If this fails, it is because you still have a GPT partition. In this
case, you have to convert from GPT to MBR)
-
format fs=ntfs quick(Formats the partition using the NTFS file system. Only
performs a quick format, doesn't bother zeroing out every bit on the hard
drive. This line is important because if the partition is not
formatted, then the Windows Installer will take this opportunity to
re-create the 100 MB partition)
exit (we are done with DiskPart.exe)
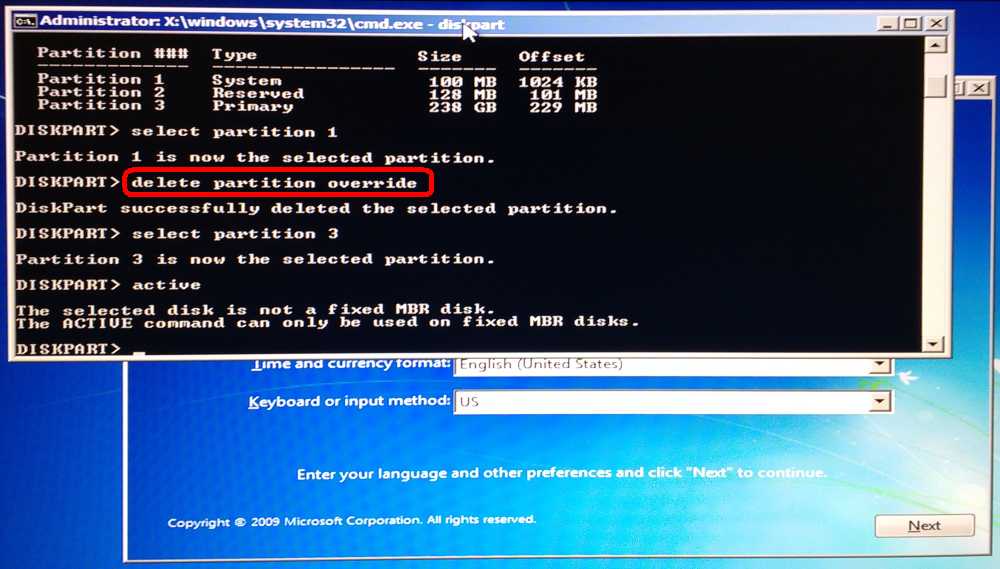
Below is a screenshot where the command active gives the following error:
The selected disk is not a fixed MBR disk.
The ACTIVE command can only be used on a fixed MBR disks.
After converting from GPT to MBR and exiting DiskPart.exe, you may have to
open another Command Prompt () use the following commands:
BootRec.exe /FixBoot Writes a boot sector onto the system partition to start Windows
I am not sure if BootRec.exe /FixBoot is really necessary.
Again, I was trying *everything* I could find to make VeraCrypt boot from my SSD
drive which was a GPT drive at the time of the purchase.
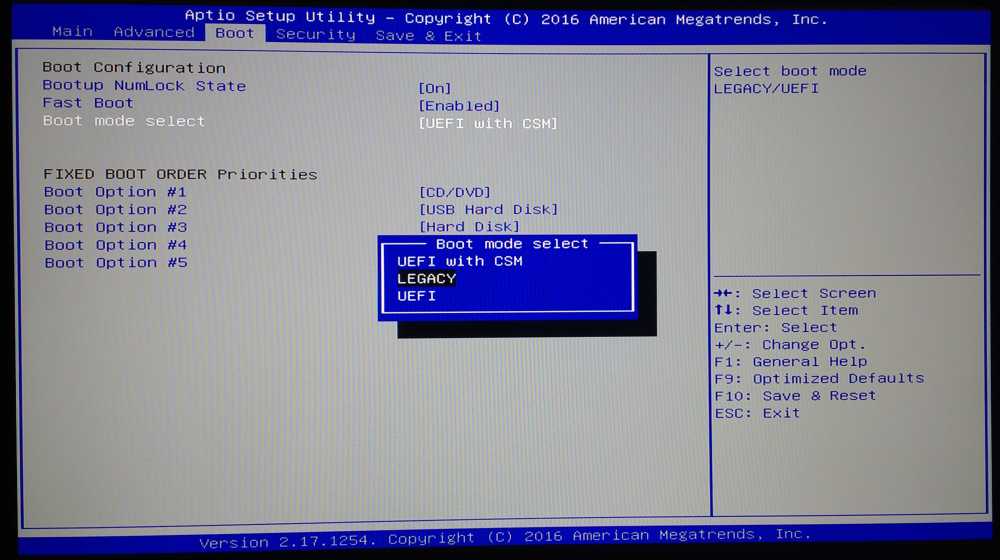
After installing Windows, your machine may not reboot at all. To fix
this, you have to go to the BIOS and change the boot mode from UEFI
with CSM to LEGACY.
Et Voilà!
I am sure the entire procedure above may be optimized to something shorter
and simpler. Next time I have a new computer to install VeraCrypt, I will
polish the procedure. In the meantime, this procedure works to fully
encrypt the system drive.
Running VeraCrypt
You will notice during boot time, just after you type your password,
VeraCrypt will display Verifying Password which will take a long time,
typically 30 seconds to a full minute. This is not a bug, but a security
feature which uses more iterations to protect your password from hackers.
If you have been a TrueCrypt user, the time to verify your password was almost
instant. To make this faster, you may set the PIM (Personal Iterations
Multiplier) or make your password longer. The longer your password, the
lower is the default value of iterations to validate your password. VeraCrypt
requires that the volume's password be at least 20 characters in length if you
want a PIM of less than the default value of 485.
According to
Mounir IDRASSI (the developer of VeraCrypt), the code of VeraCrypt BIOS boot loader runs in a restricted
environment with limited resources and legacy mode (16-bit), which make all
cryptographic computation slower. Once Windows is started, we go back to normal
more with no performance degradation. for TrueCrypt users, booting using
VeraCrypt would seem like an eternity but you can't have a fast boot and a good
security level. As I explained in different posts, reducing the key derivation
complexity to make it as fast as in TrueCrypt is not the good answer. The
objective of VeraCrypt is guarantee a minimal security level for the next 10
years and the key derivation complexity was chosen with that respect. The real
solution is to rewrite of the bootloader in order to switch to full 32-bit
performance which will divide the boot time by a 2 or 3. This is part of the
roadmap and it is the next objective of VeraCrypt. For more details, visit
https://sourceforge.net/p/veracrypt/discussion/technical/thread/77d58591/
(VeraCrypt long boot time).
Now that the boot drive (C:) has been encrypted, it is time to encrypt the
secondary drive (D:). Although this is a GPT drive, it is not an issue
since VeraCrypt supports GPT drives. Before encrypting the drive, we will
assign a different drive letter so any installed application and shortcuts will
be preserved. This is because VeraCrypt will mount the drive as a new
letter, and it is preferable to reuse the letter D: as the mounted drive.
1. Start the Disk Management snapin located in the Control Panel (or by
typing diskmgmt.msc in a Command Prompt)
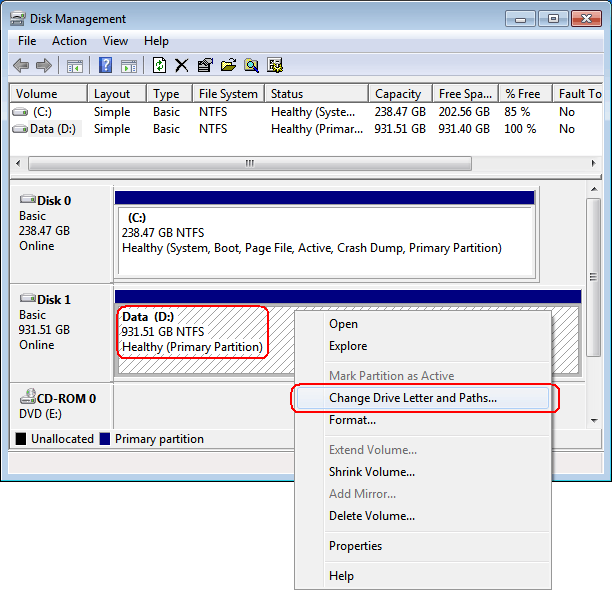
2. Select second drive (D:), right click and select the menu item Change
Drive Letter and Paths.
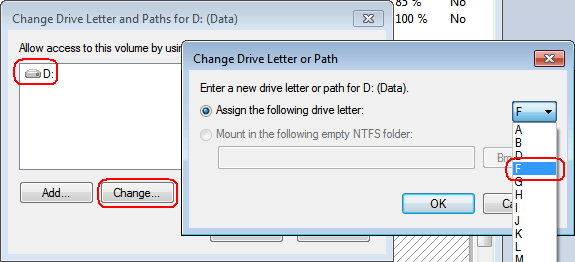
3. Click on the button Change and pick another available letter. In my
case, I picked up the letter F.
4. Exit Disk Management.
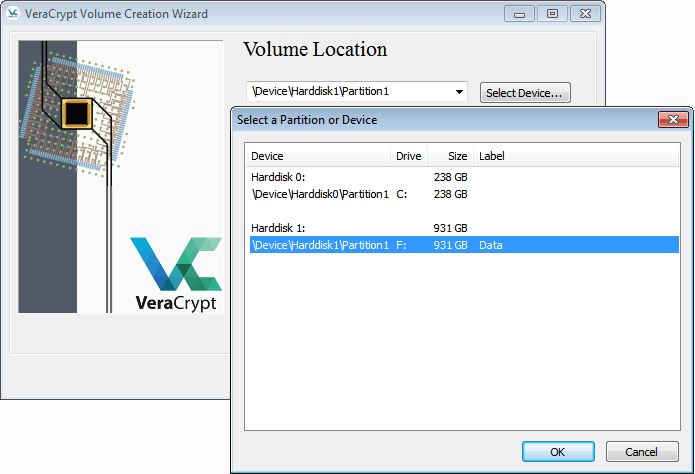
5. In VeraCrypt, click on the button Create Volume and select
Encrypt a non-system partition/drive.
6. Select Standard VeraCrypt volume and later select the drive F:
as the device to encrypt.
7. If the drive is empty, select Create encrypted volume and format it,
otherwise select Encrypt partition in place to preserve your data.
8. Type the same password as your boot drive. This is important
because VeraCrypt will automatically mount this drive when Windows starts as
long as the secondary drive has the same password as the primary drive.
9. Select Yes for Large Files.
10. Pick NTFS as the filesystem option. For some reasons,
the default is exFAT.
11. Click on the button Format to format/encrypt your drive.
This may take hours.
Once your drive is encrypted, to VeraCrypt and
click on the menu Favorites and select the menu item Add mounted
Volume to System Favorites. Select drive D: as the mounted drive, so your
encrypted drive behave exactly as before it was encrypted.
At the bottom of the window, in the Global Settings, make sure you
check the option Mount system favorite volumes when Windows Starts.
PS: Don't forget to support the development of VeraCrypt. If you use
VeraCrypt and want to continue using it, someone has to spend time to maintain
the software to support new hardware and/or changes in operating systems.
Such development requires skills and people having such skills have many
opportunities to work elsewhere where they could earn good money. Your
donation to VeraCrypt helps to keep talented people continue developing open
source projects.
|